> For the complete documentation index, see [llms.txt](https://docs.ylem.co/llms.txt). Markdown versions of documentation pages are available by appending `.md` to page URLs; this page is available as [Markdown](https://docs.ylem.co/integrations/library-of-integrations/slack.md).
# Slack
{% hint style="info" %}
Open-source and On-premise editions of Ylem require separate specific configurations for this integration. See [below](#configuring-integration-for-open-source-and-on-premise-versions)
{% endhint %}
**Integration type**: `Write`
Integration with Slack allows you to send messages to various channels including private ones.
**Data for the connection:**
{% hint style="info" %}
Please note that you need admin permissions for your Slack organization to authorize Ylem to send messages to it.
{% endhint %}
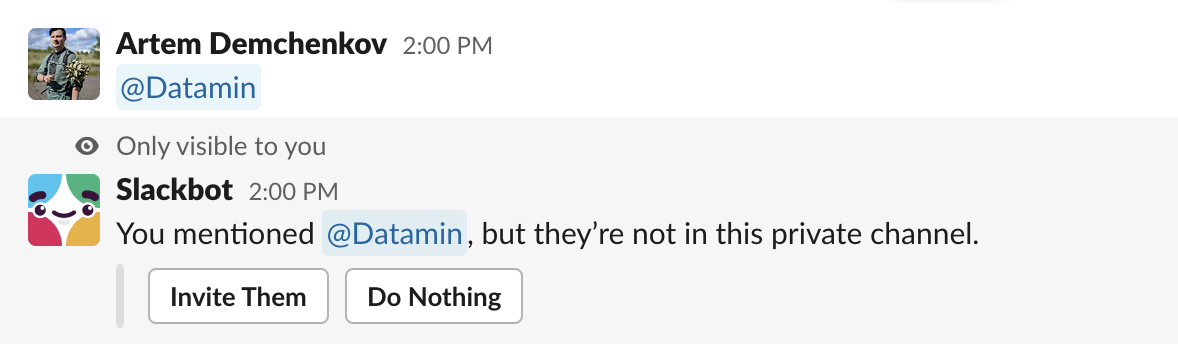
## Authorizing Ylem in private Slack channels
To publish messages in private groups on Slack, you need to add Ylem (app) into the group first.
To do it, type @Ylem in the group and click on "**Invite Them**".
## Configuring integration for open-source and on-premise versions
If you don't use the cloud version of Ylem but have it installed on your infrastructure under your domain name, you need to create your own Slack OAuth 2.0 application to make this integration work.
### Step 1. Create Slack Application
As the first step, you need to go to the and create your own "OAuth 2.0" application.
{% hint style="info" %}
You don't need to distribute your application publically on Slack Marketplace because it belongs to the same workspace you are planning to use it for.
{% endhint %}
Add the following as **Bot Token Scopes**:
Slack App also needs a redirect URL to return users to after a successful authorization. Use this one and just replace the domain name with your one that internally proxies the request to `ylem_integrations:7337`:
```bash
https://%%YOUR_DOMAIN_NAME%%/slack/authorize
```
As soon as the application is ready, you can open its "Settings" and copy your CLIENT\_ID and CLIENT\_SECRET. These two values you will need to add to your Ylem configuration now.
Additional information about creating and configuring Slack Apps can be found in their [official documentation](https://api.slack.com/quickstart#creating).
#### Step 2. Configure Ylem .env parameters
The following parameters need to be changed on the `backend/integrations/.env` file:
```bash
INTEGRATIONS_SLACK_OAUTH_CLIENT_ID=%%REPLACE_IT_WITH_THE_CLIENT_ID_OF_YOUR_APP%%
INTEGRATIONS_SLACK_OAUTH_CLIENT_SECRET=%%REPLACE_IT_WITH_THE_CLIENT_SECRET_OF_YOUR_APP%%
INTEGRATIONS_SLACK_AFTER_AUTHORIZATION_REDIRECT_URL=https://%%REPLACE_IT_WITH_THE_DOMAIN_NAME_OF_YOUR_YLEM_INSTANCE%%/jira-authorizations/{uuid}/?justConnected
```
Now you can open **https\://%%YOUR\_YLEM\_DOMAIN\_NAME%%/slack-authorizations** and try to authorize Slack Integration by clicking on the button "**Add Slack authorization**".
---
# Agent Instructions
This documentation is published with GitBook. GitBook is the documentation platform designed so that both humans and AI agents can read, navigate, and reason over technical content effectively. Learn more at gitbook.com.
## Querying This Documentation
If you need additional information that is not directly available in this page, you can query the documentation dynamically by asking a question.
Perform an HTTP GET request on the current page URL with the `ask` query parameter:
```
GET https://docs.ylem.co/integrations/library-of-integrations/slack.md?ask=
```
The question should be specific, self-contained, and written in natural language.
The response will contain a direct answer to the question and relevant excerpts and sources from the documentation.
Use this mechanism when the answer is not explicitly present in the current page, you need clarification or additional context, or you want to retrieve related documentation sections.